 Billing
& Support
Billing
& Support Multicraft
 Game
Panel
Game
Panel


How to Change the Default Map on Your Left 4 Dead Server
Setting a custom Default Map ensures that your server always loads into your favorite campaign or survival arena upon startup. Whether you want to jump straight into No Mercy or a custom Workshop campaign, the GGServers panel makes this transition seamless. Follow the steps below to update your starting map settings.
Step 1: Access the Panel
Log in to your GGServers Control Panel and select your Left 4 Dead 2 server. This dashboard allows you to manage the core identity and rotation of your game world.
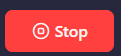
Step 2: Stop Your Server
To ensure your new map configuration is correctly written to the server files, you must first stop the server. Click the red Stop button on the main console. Wait until the status indicator displays “Offline” before proceeding.
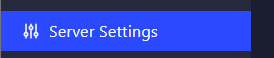
Step 3: Navigate to Server Settings
On the left-hand navigation sidebar, click on the Server Settings button. This menu gives you access to the performance and gameplay configuration toggles for your L4D instance.
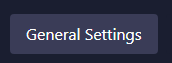
Step 4: Open General Settings
In the Server Settings area, select the General Settings tab. This section manages the fundamental startup parameters, including the default campaign and map names.
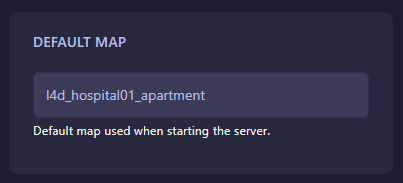
Step 5: Change the Setting That Will Auto Save
Locate the box labeled Default Map. Enter the map code for your desired campaign (e.g., c1m1_hotel for Dead Center). The GGServers panel features an automatic save function; your changes will be recorded as soon as you finish typing.
Step 6: That is it!
Your default map has been updated! Return to the main dashboard and click Start. Your Left 4 Dead 2 server will now automatically load into the campaign you selected every time it boots up.
Host the ultimate zombie survival experience with Left 4 Dead 2 server hosting at GGServers. With high-clock-speed CPUs and NVMe storage, your campaigns will run smoother than ever!