
When you configure your server, you may want to upload a custom world to improve your 7 Days to Die experience. In this guide, we will walk you through the process of locating your local worlds and then uploading one of them to your server.
Locate Your World
To upload your custom world, you need to first generate it in single-player and find it as shown below:
- Start 7 Days to Die, then generate a world in single-player.
- Press the Windows button and type
run, then pressEnter.
- Type in the box the following text, then click
Ok:%appdata%7DaysToDieSaves.
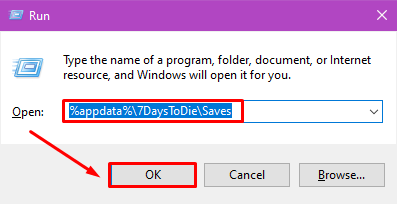
Here you can find folders corresponding to each specific generation type. The world folders are located inside them, depending on the generation type used.
- Get a copy of your generation folder, which contains the world folder. You will also have to note the name of the generation folder (
Navezganein the example below) and the world folder (My Gamein the example below).
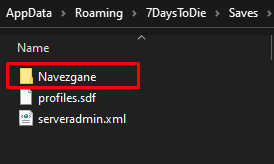

Now, you’ve just got a copy of your world folder!
Custom Generation
If you are using a custom generation for your world, some extra steps are required:
- Open your game installation folder, open the
Datafolder, then theWorldsfolder.
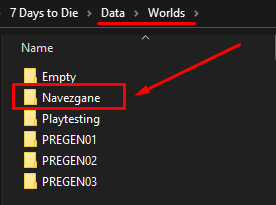
- Open the folder with the same name as your custom generation type, then open the file titled
map_info.xmlwith a text editor like NotePad.
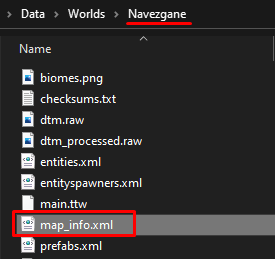
- Locate the following options and note their values:
HeightMapSize,Generation.Seed.

How to Upload Your World
To upload an existing world, you need to:
- Connect via WinSCP to your server and upload the world folder saved in the last steps under the
User/Savesfolder.

- Log in to your game server panel here.
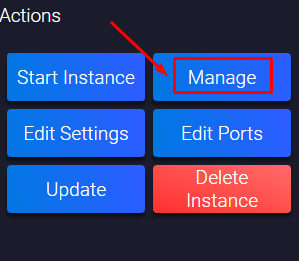
- Click on your 7 Days to Die instance, then click on
Manage, and then stop the server.

- Click on
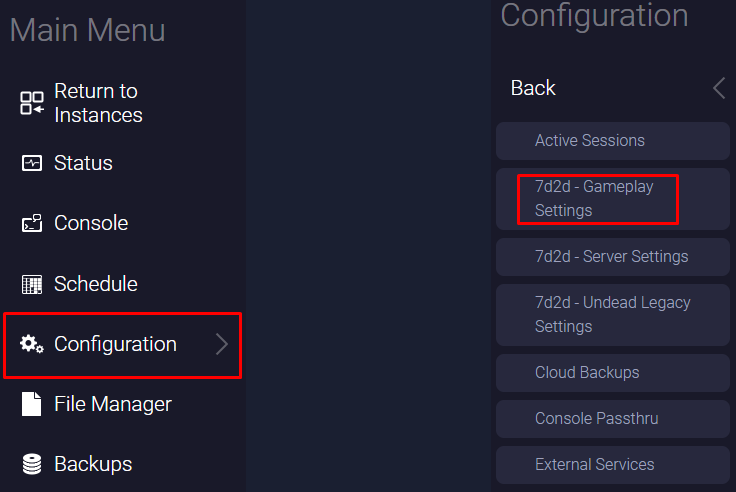
Configuration, then on7d2d - Gameplay Settings.
- Find the
Game Worldsection and set it to the generation type folder name you saved in the steps above. Then find theGame Namesection and set it to the actual world folder name you saved in the steps above.


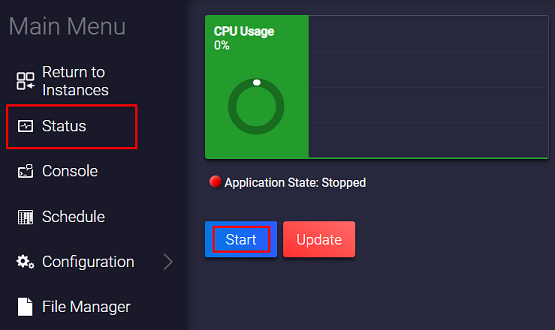
- Start your 7 Days to Die server by clicking on
Status, then onStart.
Now you’ve just set up your custom world on your V Rising server.
How to Change Between Worlds
To switch back to your old world, you just need to:
- Log in to your game server panel here.
- Click on your 7 Days to Die instance, then click on
Manage, and then stop the server.


- Click on
Configuration, then on7d2d - Gameplay Settings.

- Find the
Game Worldsection, and set it back to your old generation type. Then find theGame Nameand set it to the old world name you were using.


- Start your 7 Days to Die server by clicking on
Status, then onStart.

Now you’ve just changed back to your old world.
If you find any issues, contact us on live chat or via the ticket system.
 Billing
& Support
 Multicraft
 Game
Panel


