 Billing
& Support
Billing
& Support Multicraft
 Game
Panel
Game
Panel


Want players on your Project Zomboid server to spawn in different towns, safehouses, or even based on their profession? You can fully customize spawn locations by creating your own .lua files. This guide will walk you through the full process, from creating spawnpoint files to linking them with the game.
⚠️ Advanced Setup Warning
This guide involves creating and editing multiple.luafiles. If the format is even slightly incorrect (e.g., missing commas or brackets), your server may fail to start or crash on launch.
Always back up your files before making changes.
Getting Coordinates for Your Spawn Location
Before changing the server settings, you’ll need to get the coordinates of where you want players to spawn.
Here’s how to get accurate coordinates using the official Project Zomboid map:
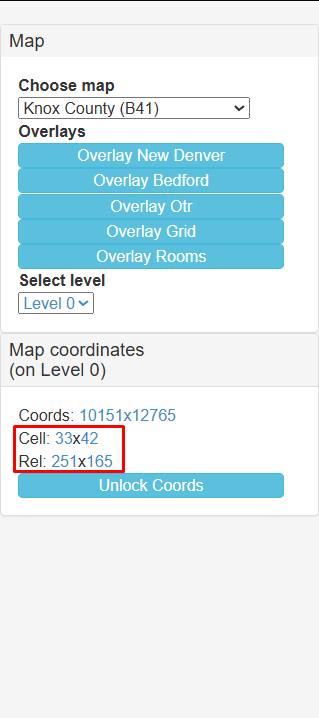
1. Go to the Project Zomboid World Map.
2. Select the map your server is using (like Knox County).
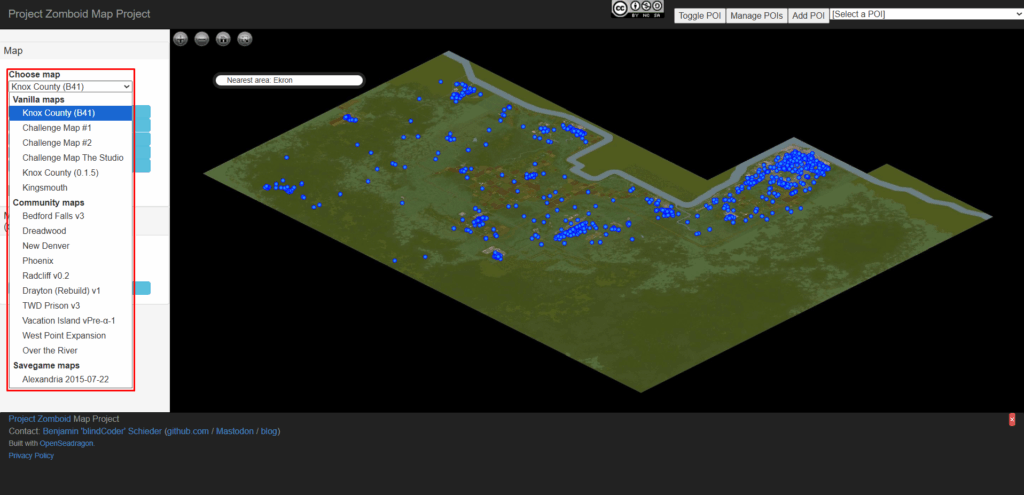
3. At the top, click the Map Coordinates tab.
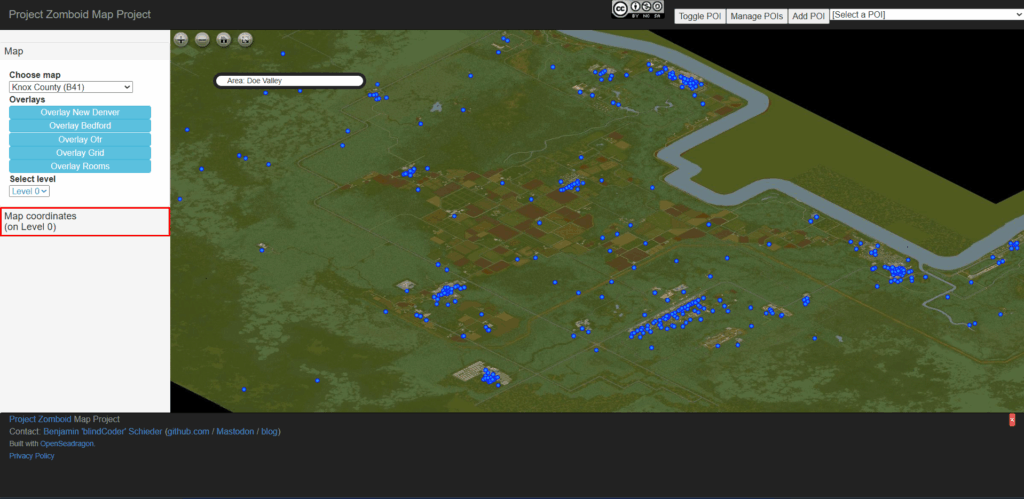
4. Press Lock Coords, then click anywhere on the map to mark your desired spawn spot.
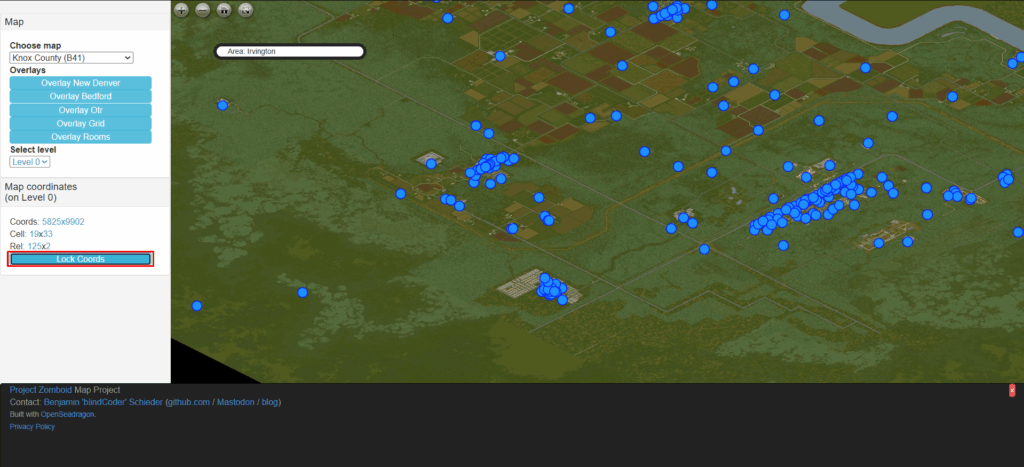
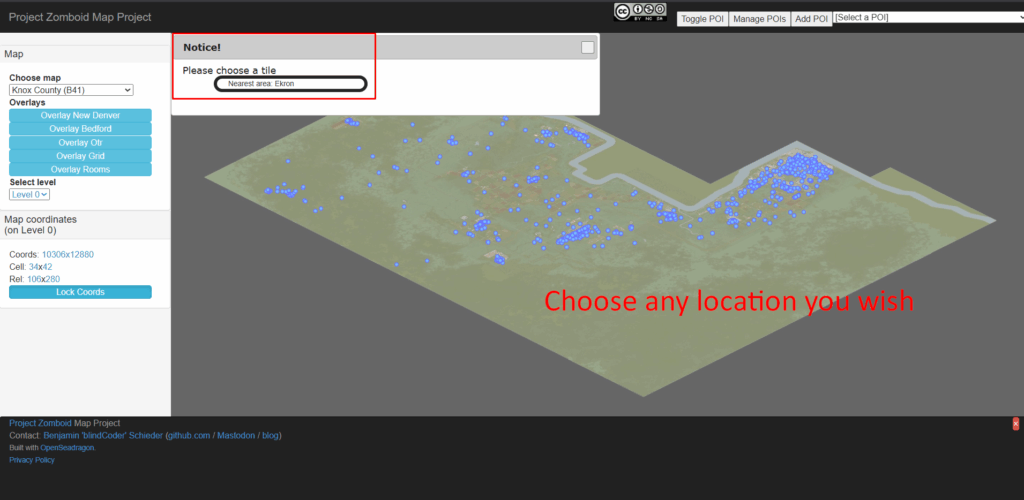
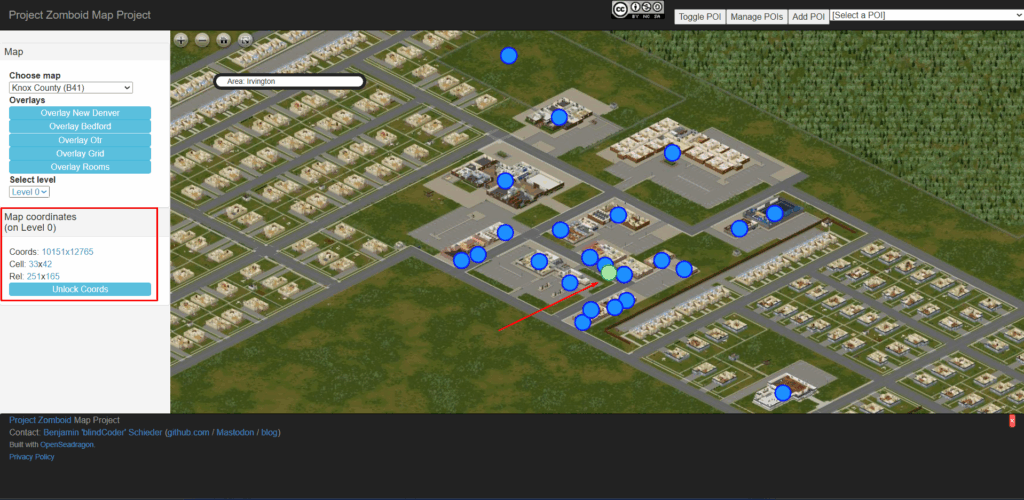
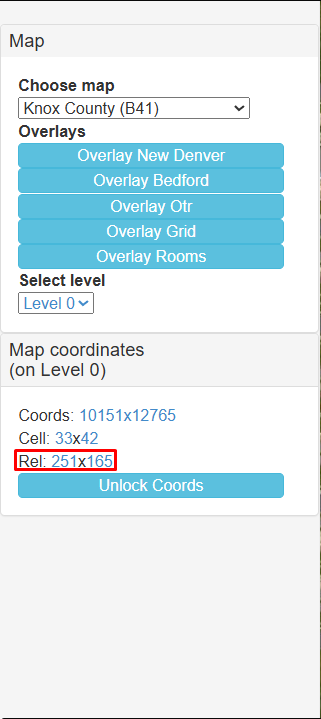
5. Take note of the following:
Cell (CelX, CelY) — grid cell on the map
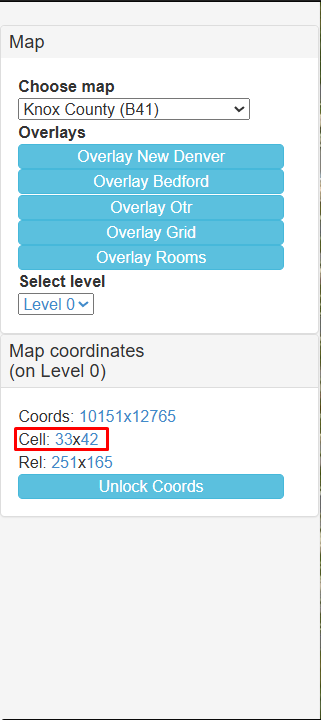
Rel (RelX, RelY) — exact position inside that cell
Setting Up Custom Spawn Locations (Player Spawn Menu)
⚠️ Advanced Configuration Warning:
This guide involves editing and creating .lua files manually. If you’re unfamiliar with this, take your time and back up your files before making changes.
Note: You can’t add custom images or descriptions to each spawn without having your players manually install files on their own machines, which is not recommended for most servers.
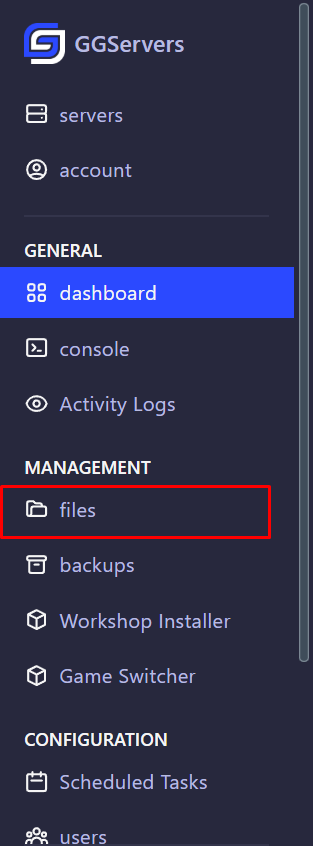
1. Login and stop your server from the panel. If you aren’t sure how to login and access your panel, we have a guide here.

2. Click on Files. Then go to and open: Pterodactyl/Server/Pterodactyl_spawnpoints.lua
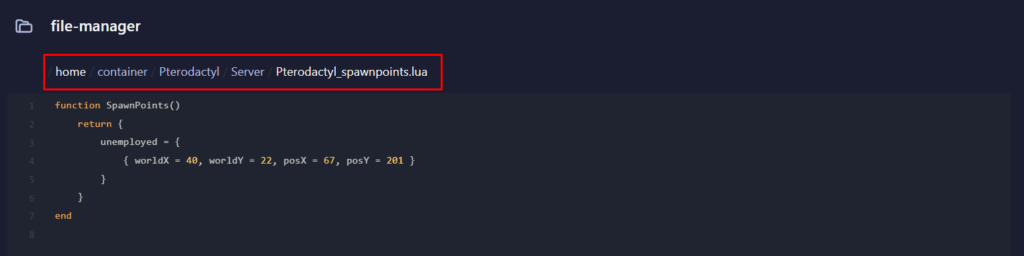
3. Replace the values in the file with the values you got.
- worldX/worldY → these are Cell coordinates
- posX/posY → these are Rel coordinates
So for our example:
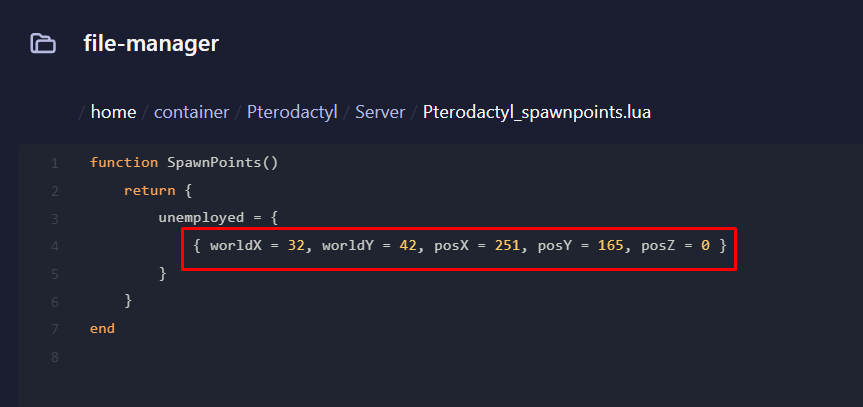
Note: posZ is your map level (0 = ground, 1 = second floor, etc.)
Make sure to save the file after editing
Add More Spawn Locations (Optional)
You can add multiple spawn locations under the same occupation for randomness:
function SpawnPoints()
    return {
        unemployed = {
            { worldX = 33, worldY = 42, posX = 251, posY = 165, posZ = 0 },
            { worldX = 33, worldY = 42, posX = 240, posY = 150, posZ = 0 },
            { worldX = 33, worldY = 42, posX = 220, posY = 180, posZ = 0 },
        }
    }
endNote: Using
unemployed =means any profession will use those spawnpoints unless otherwise specified.
If you want to support different jobs spawning in different places, use this structure:
function SpawnPoints()
    return {
        unemployed = {
            { worldX = 33, worldY = 42, posX = 251, posY = 165, posZ = 0 }
        },
        fireofficer = {
            { worldX = 34, worldY = 42, posX = 200, posY = 140, posZ = 0 }
        },
        policeofficer = {
            { worldX = 35, worldY = 41, posX = 190, posY = 160, posZ = 0 }
        }
    }
end
Each job listed will only spawn at its matching set of coordinates.
Link Spawnpoints in spawnregions.lua
Now you need to tell the server which custom spawn file to load.
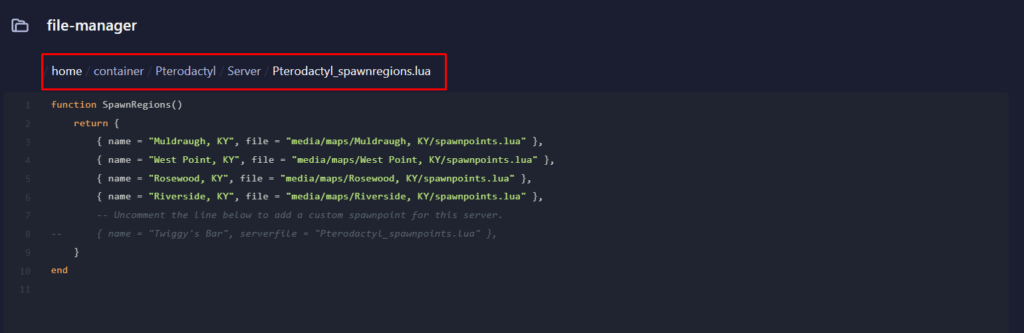
1. Go to: /Pterodactyl/Server/Pterodactyl_spawnregions.lua
2. OPTIONAL: Remove Default Spawns (If You Want to Force Only One Custom Option)
By default, Project Zomboid offers multiple spawn choices like Muldraugh or Riverside. If you want to remove these and only show your custom spawn option, edit your Pterodactyl_spawnregions.lua to look like this:
function SpawnRegions()
	return {
		{ name = "Custom Spawn", file = "Pterodactyl_spawnpoints.lua" }
	}
end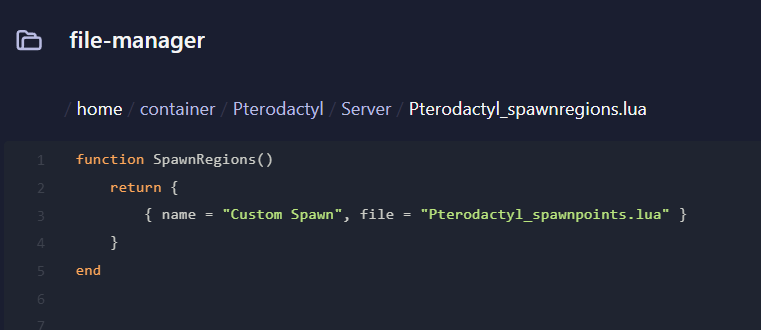
This removes all city-based spawns and only shows your custom one in the spawn menu.
Tip: You can name
"Custom Spawn"anything you want, players will see that name on the spawn screen.Make sure to save the file after editing
Final Step: Save & Restart
- Save both
.luafiles. - Restart your server from the panel.
Done! Your custom spawnpoint setup is now live.
Adding Multiple Spawnpoint Files (Optional)
If you want to offer more than one custom spawn option, you can do that by creating additional .lua spawnpoint files. For example, if you want players to choose between a main base and an outpost.
Create Additional Spawnpoints Files
Make a copy of your existing file Pterodactyl_spawnpoints.lua and rename it to something like:
Pterodactyl_spawnpoints2.luaPterodactyl_spawnpoints3.luaThen edit each file and add different coordinates for each location:
-- Pterodactyl_spawnpoints2.lua
function SpawnPoints()
    return {
        unemployed = {
            { worldX = 34, worldY = 42, posX = 200, posY = 160, posZ = 0 }
        }
    }
end
Link Each File in Pterodactyl_spawnregions.lua
Now you need to add a reference to each new file in your Pterodactyl_spawnregions.lua so the server knows to include it in the spawn menu.
function SpawnRegions()
	return {
		{ name = "Muldraugh, KY", file = "media/maps/Muldraugh, KY/spawnpoints.lua" },
		{ name = "Riverside, KY", file = "media/maps/Riverside, KY/spawnpoints.lua" },
		{ name = "Rosewood, KY", file = "media/maps/Rosewood, KY/spawnpoints.lua" },
		{ name = "West Point, KY", file = "media/maps/West Point, KY/spawnpoints.lua" },
		{ name = "Custom Spawn 1", file = "media/maps/Pterodactyl_spawnpoints.lua" },
		{ name = "Custom Spawn 2", file = "media/maps/Pterodactyl_spawnpoints2.lua" }
	}
end
"Custom Spawn 1"and"Custom Spawn 2"are the names that will show up in the in-game spawn menu.- Each one points to a separate file with its own list of coordinates.
Tip: You can define different professions in each file if you want them to spawn at unique locations too.
Remember to save the file after editing, and restart the server.
Troubleshooting Tips
- If your server crashes on startup, check for missing commas, brackets, or incorrect indentation.
- You can test with one file first before expanding to more.
- Make sure all
.luafiles are saved and placed in the/Pterodactyl/Server/directory.
If you have any issues, contact us via live chat or the ticket system.