Do you play Minecraft Bedrock Edition but want to use your custom skin in Minecraft Java Edition? While the two versions handle skins differently, it’s absolutely possible to transfer your Bedrock character creator skin and make it compatible with Java. In this step-by-step guide, you’ll learn how to export your Bedrock skin, convert it to the correct size, and upload it into Minecraft Java Edition.
Step 1: Export Your Bedrock Skin
The first step is to get your Bedrock Edition character skin as a downloadable PNG file. Bedrock doesn’t provide a direct export button, but you can use a reliable third-party tool.
- Open Minecraft Bedrock Edition and launch the Character Creator.
- Select the custom skin you want to use in Java Edition.
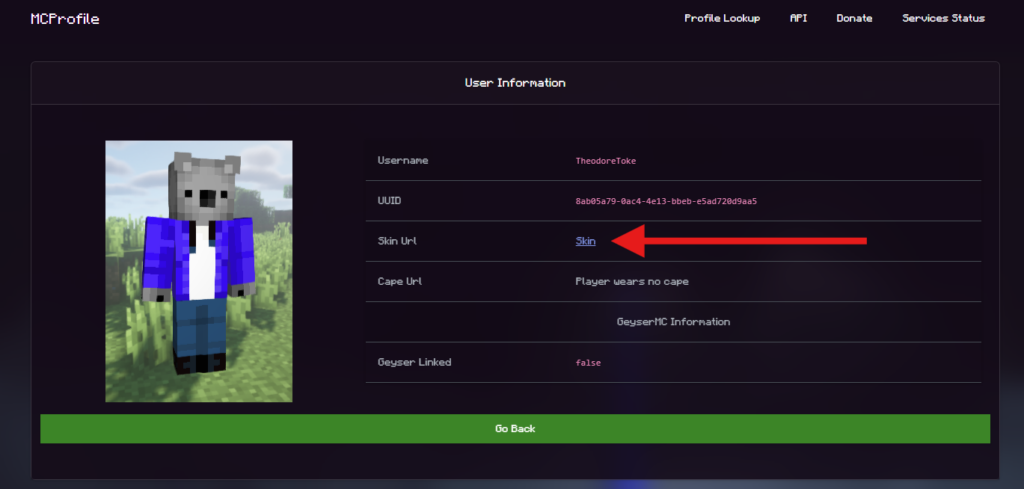
- Go to mcprofile.io (or a similar skin export tool).
- Enter your Minecraft username or upload the profile to download your Bedrock skin as a PNG file.

Step 2: Convert the Skin for Java Edition
Bedrock skins often use higher resolutions (128×128 or more), while Minecraft Java Edition requires skins in 64×64 pixels. This means you’ll need to resize and optimize your skin before uploading.
- Download and open PMCSkin3D or another Minecraft skin editor.
- Import your Bedrock skin into the program.
- Use the “Decrease Resolution” option until your skin fits the 64×64 Java Edition format.
- Preview the skin to make sure the details still look correct.
Tip: If resizing makes your skin blurry, consider manually cleaning up details in a skin editor for a sharper final look.
Step 3: Upload and Apply the Skin in Minecraft Java Edition
Once your skin is resized and saved as a 64×64 PNG, you can upload it to your Minecraft Java profile.
- Open the Minecraft Launcher on your computer.
- Click on the Skins tab from the menu.
- Select “New Skin” and give it a name.
- Upload your 64×64 skin PNG file.
- Choose the correct model type (Steve for wide arms or Alex for slim arms).
- Click Save and apply your skin.
That’s it! Your Bedrock Edition custom skin is now playable in Minecraft Java Edition. Whether you’re playing on multiplayer servers or in single-player worlds, your character will look exactly how you designed it.
Why Transfer Bedrock Skins to Java?
Many players switch between Bedrock and Java editions for different features. By transferring your skin:
- You maintain a consistent character appearance across both editions.
- You can use your custom-designed Bedrock skins on Java servers.
- You don’t have to remake your skin from scratch for Java Edition.
Minecraft Skin Compatibility FAQ
Q: Can I use HD skins from Bedrock in Java?
A: Only if resized to 64×64. Higher resolutions won’t work in Java.
Q: Do I need mods to transfer skins?
A: No. This process uses free online tools and works directly with the official launcher.
Q: Will animations or Bedrock-exclusive features transfer?
A: No. Only the static skin appearance carries over, not extra effects.
Q: Can I switch back and forth between skins?
A: Yes. Both Java and Bedrock let you store multiple skins, so you can swap anytime.
Final Thoughts
Transferring a skin from Minecraft Bedrock to Java Edition is a simple process: export → resize → upload. With the right tools, you can keep your favorite skin across both editions and enjoy a consistent look no matter where you play. For players who love customizing their characters, this is one of the best ways to bridge the gap between Minecraft Bedrock and Java.
 Billing
& Support
 Multicraft
 Game
Panel


