 Billing
& Support
Billing
& Support Multicraft
 Game
Panel
Game
Panel


If you’re planning to host a Project Zomboid server just for your friends, a private setup is the way to go. This guide will walk you through multiple ways to secure your server, including setting a password, enabling a whitelist, and hiding your server from the public server list.
Whether you’re hosting for roleplay, survival events, or a private community, this setup ensures only trusted players can join. And don’t forget, you can grab 30% off any GGServers game server with code: KB30 during checkout!
Accessing Your Server’s Settings
To start making your Project Zomboid server private, follow these steps to access your server configuration:
- Log into your GGServers Pterodactyl Panel.
- In the menu on the left-hand side, click Files.
- Locate and open the file named:
Pterodactyl/Server/Pterodactyl.iniThis is where you’ll configure privacy settings like passwords, whitelist behavior, and server visibility.
Step 1: Set a Server Password
To block access from anyone who doesn’t know your password:
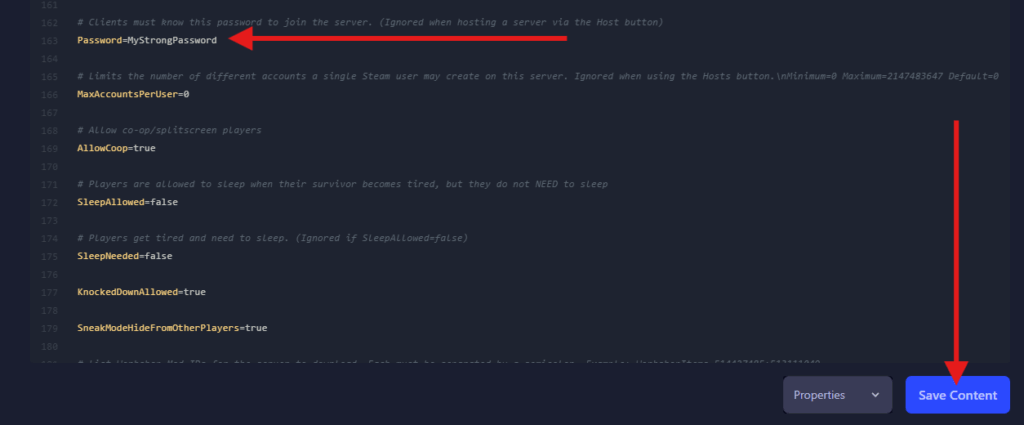
- In the
Pterodactyl.inifile, find the following line:Password= - Type in your desired password directly after the
=sign. - Click Save.
- Restart your server from the panel for changes to apply.
This makes sure only players who know the password can join—even if they find your server by IP.
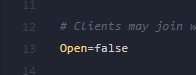
Step 2: Turn On the Whitelist
For even tighter control, use the whitelist feature to manually approve who can join your server.
- In the same
Pterodactyl.inifile, locate the line:Open= - Change its value to:
falseThis enables the whitelist. - Click Save and restart your server.
Whitelist Management Commands
To manage who’s on your whitelist, use these commands in your server console:
AddUser <username> <password>– Adds a player to both whitelist and user list.AddUserToWhitelist <username>– Adds an already registered player to the whitelist.RemoveUserFromWhitelist <username>– Removes someone from the whitelist.AddAllToWhitelist– Whitelists everyone currently online.
You can also control automatic behavior through these options in the config:
AutoCreateUserInWhiteList=true– Automatically adds new users to the whitelist.DropOffWhiteListAfterDeath=false– Prevents players from being kicked off the whitelist after death.
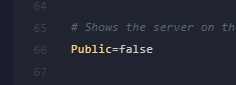
Step 3: Hide Your Server from Public Listings
To make sure your server doesn’t show up in the game’s Internet tab on Steam:
- In the same config file, find the line:
Public= - Change the value to:
false - Click Save and restart the server.
Your server will no longer appear on the public server list, even if someone is browsing for games to join.
Final Tips
- If you’re running a private group or community, we highly recommend using both a password and a whitelist.
Now your Project Zomboid server is protected and only available to those you approve! If you need more help setting things up, our 24/7 support team is always ready to assist you at:
👉 https://ggservers.com/billing/submitticket.php