 Billing
& Support
Billing
& Support Multicraft
 Game
Panel
Game
Panel


Changing your Killing Floor 2 server update settings is incredibly simple when you’re using GGServers. Our intuitive Control Panel makes it easy to enable automatic updates and keep your game version current with zero hassle. Follow the steps below to make sure your server always stays up to date and ready for action.
First, log in to your GGServers Control Panel using your credentials. Once inside, locate your Killing Floor 2 server from the list of services and stop the server before making any changes. This step ensures that the new settings are properly saved when you enable automatic updates.

After stopping the server, navigate to the Server Settings section from the left-hand navigation menu. This area contains all configuration options for your Killing Floor 2 server, allowing you to adjust gameplay settings, player limits, difficulty, and automatic updates.

Next, open the General Settings tab. This tab contains essential server options including server name, password, game difficulty, and the Auto Update feature that ensures your server stays synchronized with the latest Killing Floor 2 patches and improvements.

Inside the General Settings tab, locate the option labeled Auto Update. This toggle allows you to automatically download and apply the latest game updates each time your server restarts, ensuring your players always enjoy the newest features and bug fixes.
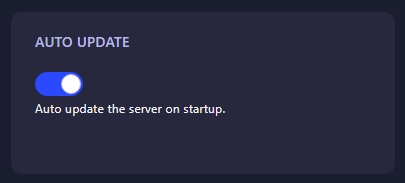
Once you toggle Auto Update on, the system will automatically save your changes. You can then start your server again and enjoy the peace of mind that comes with knowing your Killing Floor 2 server will always be running the latest version — automatically and effortlessly.
💡 Pro Tip: The GGServers Control Panel doesn’t just handle updates — it also lets you install mods, manage backups, change maps, and adjust performance settings with a few clicks. And if your community grows, you can upgrade your plan anytime for more slots, RAM, and power.