 Billing
& Support
Billing
& Support Multicraft
 Game
Panel
Game
Panel


How to Enable Auto Update on Your Soulmask Server
Keeping your Soulmask server up to date is vital for preventing “incompatible version” errors and ensuring your tribal world has the latest features and security patches. By enabling the Auto Update feature, your GGServers instance will automatically check for, download, and apply the latest Steam updates every time the server starts. Follow the steps below to automate your maintenance process.
Step 1: Access the Panel
Log in to your GGServers Control Panel and select your Soulmask server. This dashboard is where you manage all automated tasks and startup behaviors.
Step 2: Stop Your Server
To modify the startup instructions and enable the update sequence, you must first stop the server. Click the red Stop button on the main console and wait for the status to show “Offline” before proceeding.

Step 4: Navigate to Server Settings
On the left-hand navigation sidebar, click on the Server Settings button to open the configuration menu.

Step 4: Open General Settings
Within the Server Settings menu, select the General Settings tab. This section contains the core maintenance and execution rules for your Soulmask server.

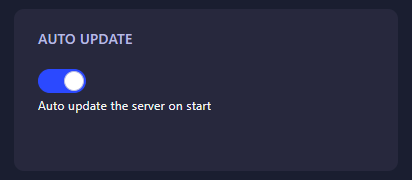
Step 5: Change the Setting That Will Auto Save
Locate the box labeled Auto Update. Toggle the switch to enable it. The GGServers panel features an automatic save function; your changes are recorded instantly. Once enabled, the server will trigger a SteamCMD update check every time you click the Start button.
Step 6: That is it!
Your server is now set to maintain itself! Return to the main dashboard and click Start. The console will display the update progress before launching the game, ensuring you are always running the latest version of Soulmask.
Keep your tribe current with Soulmask server hosting at GGServers. Our intuitive panel and high-performance NVMe storage make updating your world fast and effortless!